Tuan Anh · · 9 min read
Angular HTTP Client Module - P2. Http Options và Demo Upload & Download Progress
Mở đầu
Trong bài trước, mình đã giới thiệu sơ qua về HttpClientModule và những ứng dụng thiết yếu của nó.
Học thì phải đi đôi với hành phải không nào? Hôm nay mình sẽ tiếp tục đi tiếp với Http Options và Demo 1 tính năng đó là UPLOAD AND DOWNLOAD FILE WITH PROGRESS nhé.
Các bạn vừa đọc vừa mở IDE lên code cùng mình nhé.:)
Nào! bắt đầu thôi
1. Http Options
Trong bài trước, mình có viết mẫu một Post Service để handle những việc nhận - gửi request liên quan tới Post
@Injectable({
  providedIn: 'root',
})
export class PostService {
  constructor(
    private readonly httpClient: HttpClient
  ) {}

  getListPosts(): Observable<PostEntityModel[]> {
    return this.httpClient.get<PostEntityModel[]>(
      'https://jsonplaceholder.typicode.com/posts'
    );
  }

  createPost(post: PostEntityModel): Observable<PostEntityModel> {
    return this.httpClient.post<PostEntityModel>(
      'https://jsonplaceholder.typicode.com/posts',
      post
    );
  }

  updatePost(
    postId: number,
    post: PostEntityModel
  ): Observable<PostEntityModel> {
    return this.httpClient.put<PostEntityModel>(
      `https://jsonplaceholder.typicode.com/posts/${postId}`,
      post
    );
  }

  updateOptionPost(
    postId: number,
    post: Partial<PostEntityModel>
  ): Observable<PostEntityModel> {
    return this.httpClient.patch<PostEntityModel>(
      `https://jsonplaceholder.typicode.com/posts/${postId}`,
      post
    );
  }

  deletePost(postId: number): Observable<any> {
    return this.httpClient.delete(
      `https://jsonplaceholder.typicode.com/posts/${postId}`
    );
  }
}
Trong các method như get, post, put, có params là các option khi thực hiện 1 request http. Nó có dạng như sau:
options: {
  headers?: HttpHeaders | {[header: string]: string | string[]},
  observe?: 'body' | 'events' | 'response',
  params?: HttpParams|{[param: string]: string | string[]},
  reportProgress?: boolean,
  responseType?: 'arraybuffer'|'blob'|'json'|'text',
  withCredentials?: boolean,
}
Chúng ta cùng tìm hiểu và sử dụng các option này nhé.
1.1 Headers
headers trong http options là header configuration cho 1 Http Request. Nó có thể là 1 HttpHeaders hoặc 1 object có key là string và giá trị là 1 string hoặc 1 mảng string.
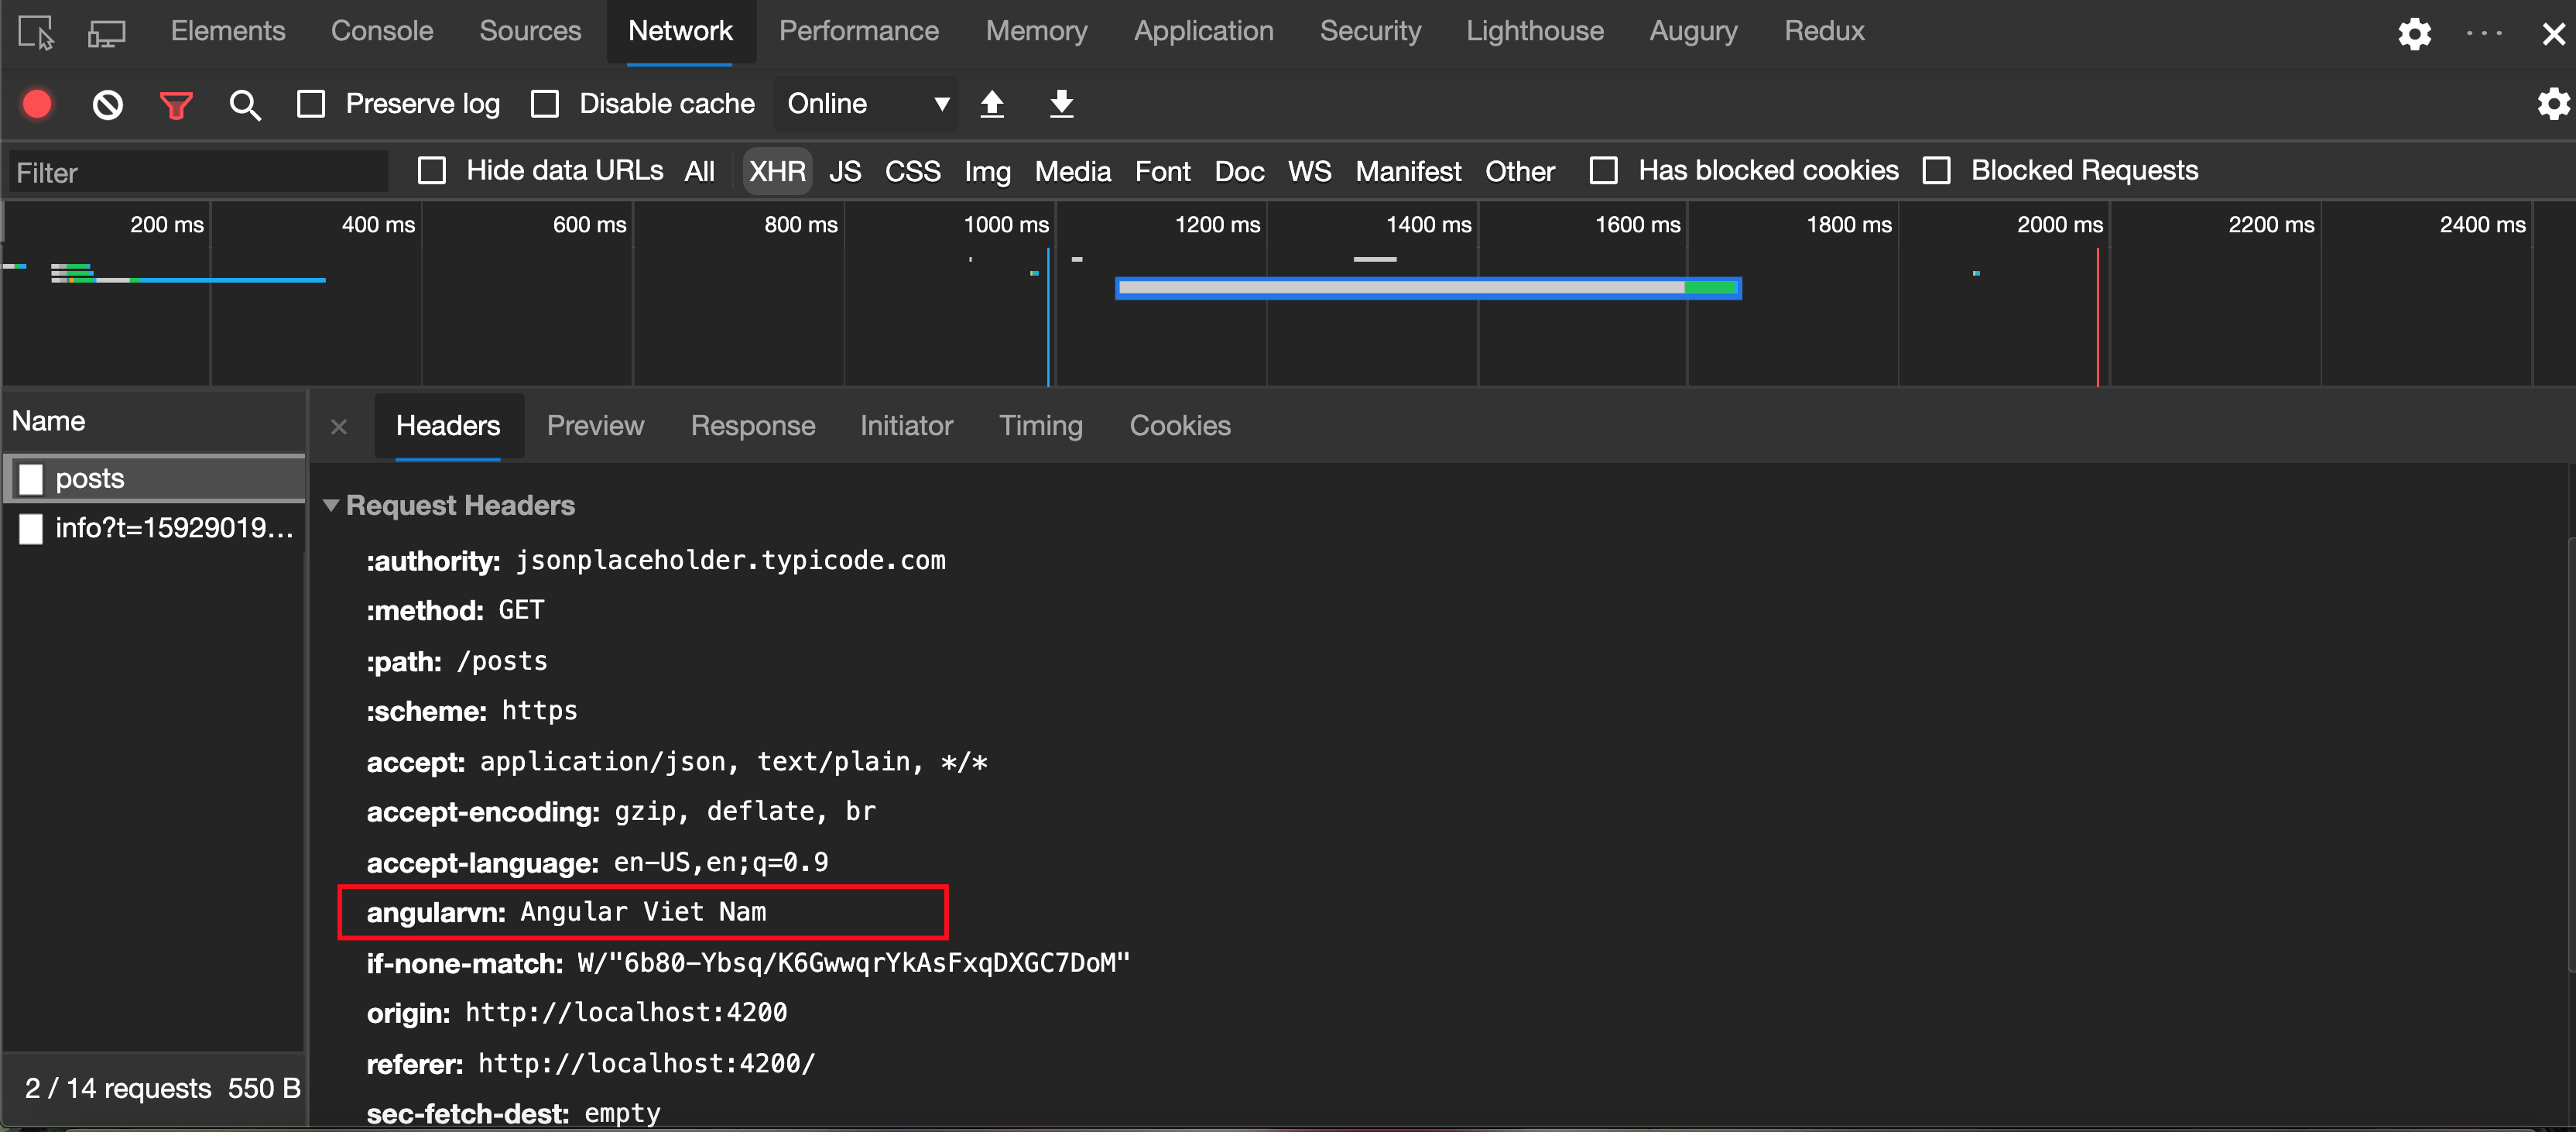
ví dụ hàm GET:
getListPosts(): Observable<PostEntityModel[]> {
  return this.httpClient.get<PostEntityModel[]>(
    'https://jsonplaceholder.typicode.com/posts',
    { headers: { angularVN: 'Angular Việt Nam' }}
  );
}
Hoặc sử dụng HttpHeaders:
getListPosts(): Observable<PostEntityModel[]> {
  return this.httpClient.get<PostEntityModel[]>(
    'https://jsonplaceholder.typicode.com/posts',
    { headers: new HttpHeaders({ angularVN: 'Angular Viet Nam' })}
  );
}
Kết quả:
Các bạn nên nhớ. Instance của một HttpHeaders là immutable nhé. Nghĩa là mỗi lần modify là trả về 1 cloned instance kèm thèm giá trị vừa modify nhé.
Ví dụ:
getListPosts(): Observable<PostEntityModel[]> {
  const headers: HttpHeaders = new HttpHeaders();
  headers.set('angularVN', 'Angular Viet Nam');
  return this.httpClient.get<PostEntityModel[]>(
    'https://jsonplaceholder.typicode.com/posts',
    { headers }
  );
}
Kết quả:
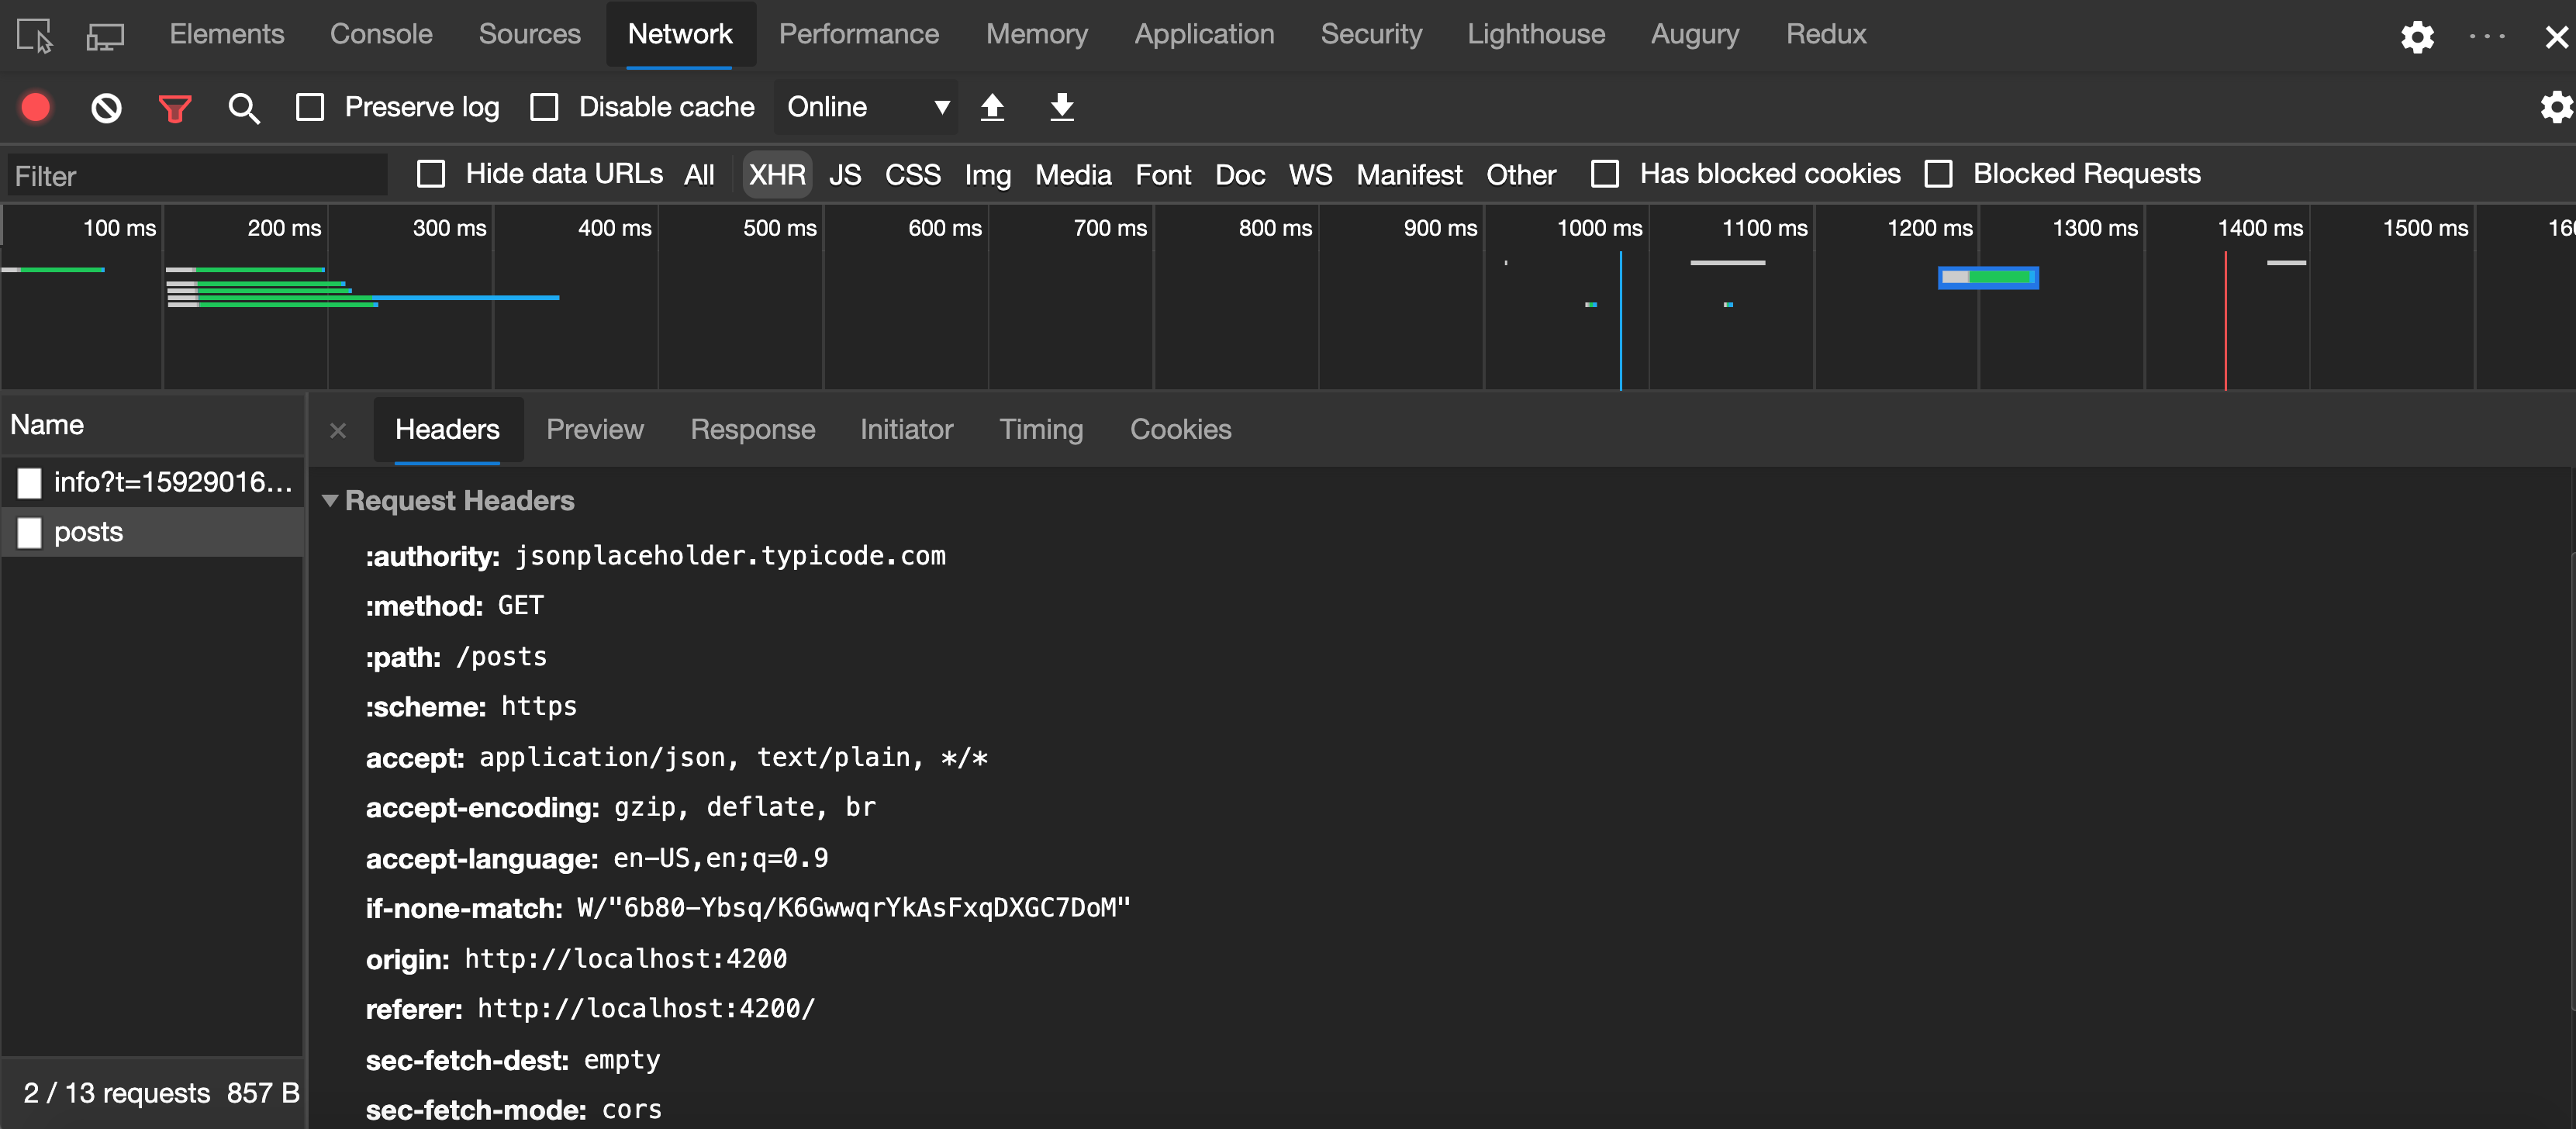
Ở đây Request Header không có key angularVN. Như đã nói ở trên. mỗi lần modify là trả về 1 cloned instance kèm thèm giá trị vừa modify. Giải quyết bằng cách:
getListPosts(): Observable<PostEntityModel[]> {
  let headers: HttpHeaders = new HttpHeaders();
  headers = headers.set('angularVN', 'Angular Viet Nam'); // --> gán lại cho biến headers
  return this.httpClient.get<PostEntityModel[]>(
    'https://jsonplaceholder.typicode.com/posts',
    { headers}
  );
}
Và kết quả là:
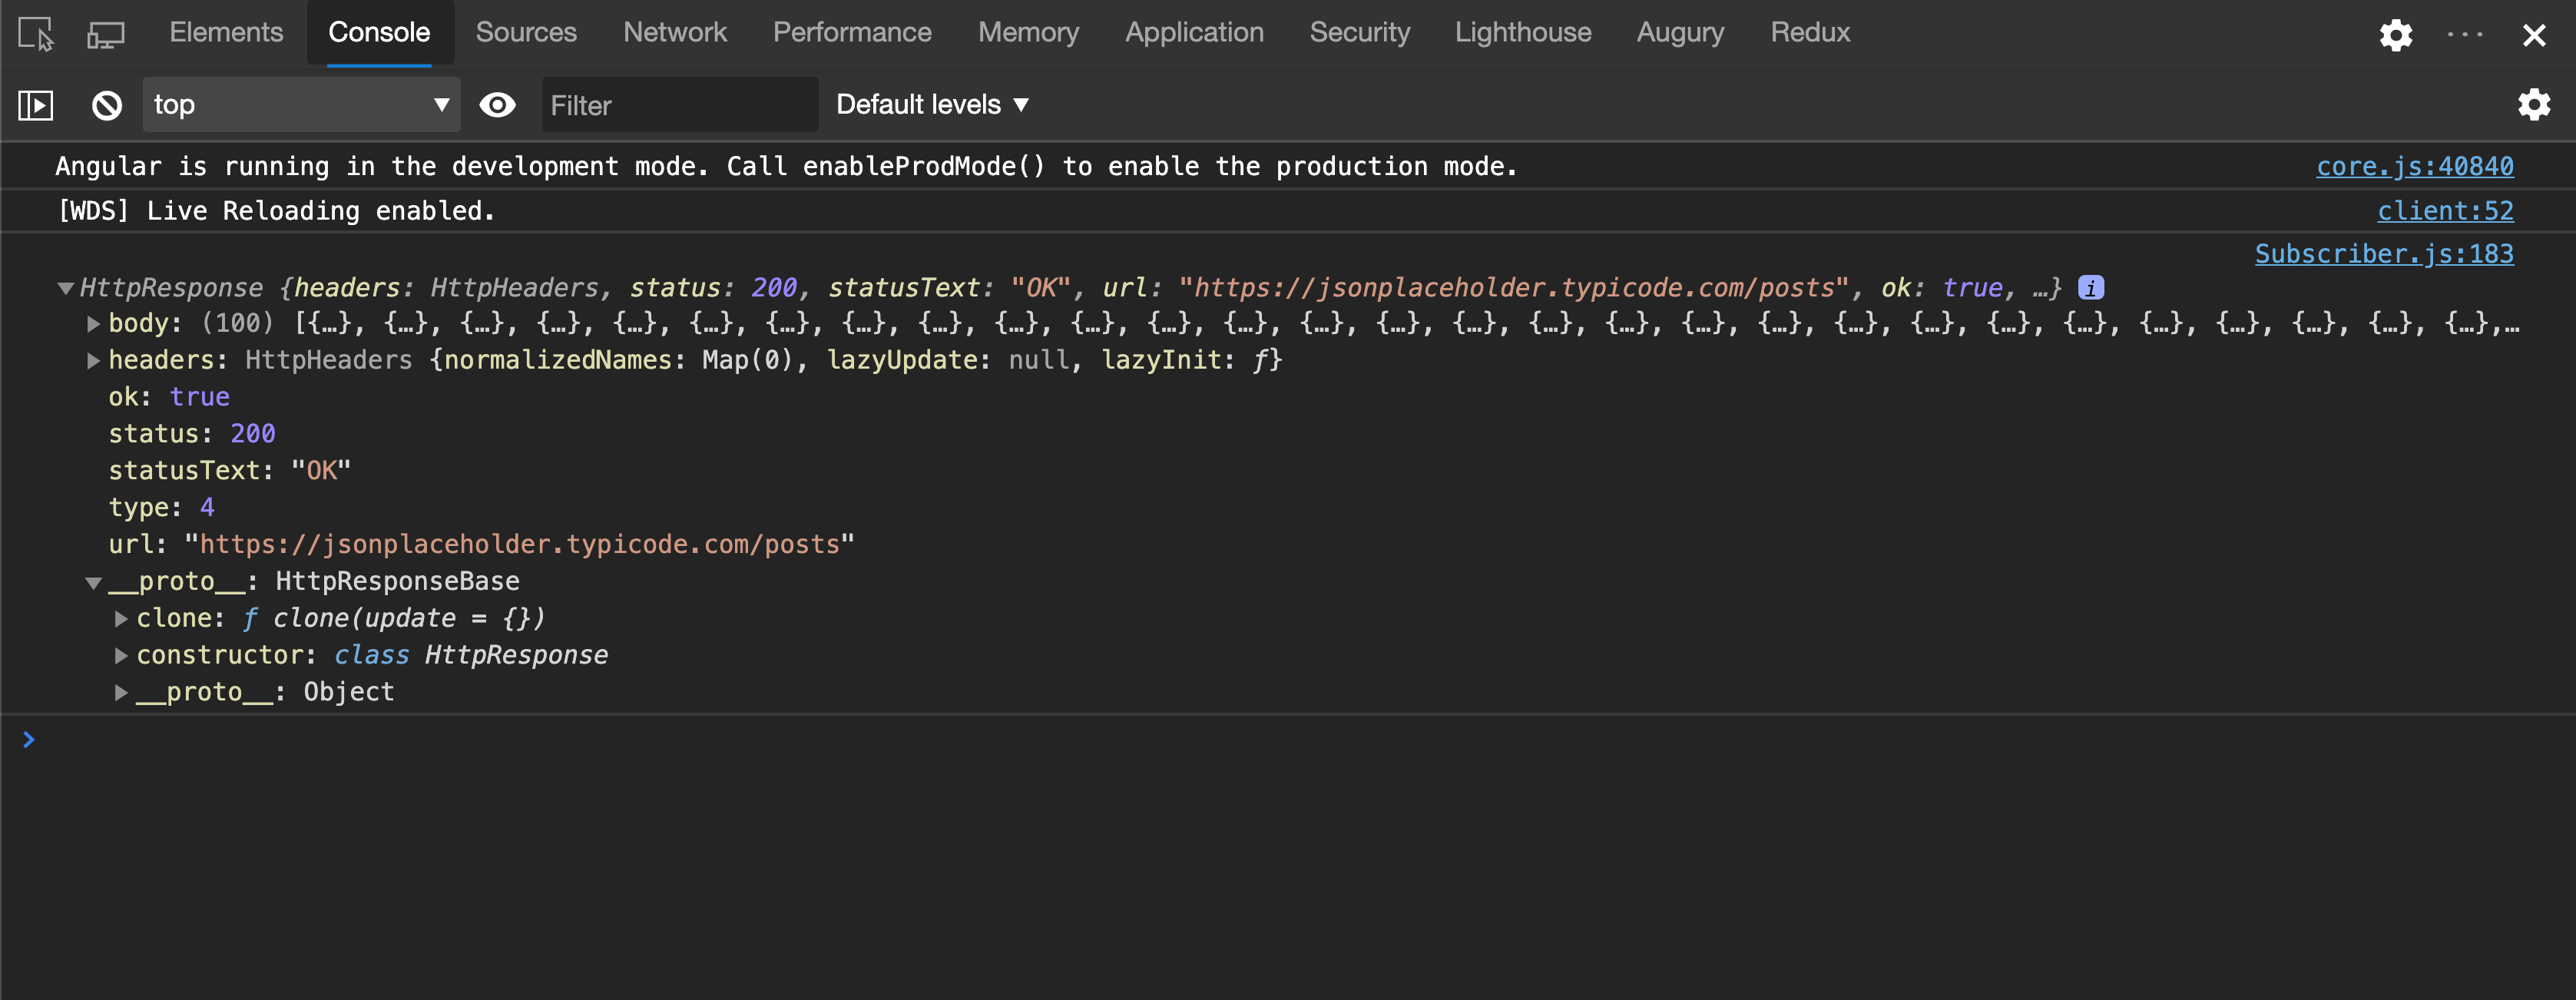
1.2 Observe observe là một giá trị kiểu string thuộc enum `‘body’ | ‘events’
| ‘response’. Nó báo cho HttpClientbiết mình muốn lấy response ở mức độ nào. Mặc định nếu không set trong options thì sẽ lấy observe là’body’. Chúng ta cùng điểm qua các observe` value nhé.
1.2.1 Observe ‘body’
Mặc định khi gửi 1 Http Request và nhận lại một response. Chúng ta sẽ nhận được data là body của HttpResponse
getListPosts(): Observable<PostEntityModel[]> {
  return this.httpClient.get<PostEntityModel[]>(
    'https://jsonplaceholder.typicode.com/posts',
    { observe: 'body' });
}
1.2.2 Observe ‘response’
Khi xử lý 1 Http Request, bạn có thể cần nhiều thông tin hơn về response như status, statusText, headers. Chúng ta sử dụng option observe: 'response' để hiển thị thêm thông tin của Http Response đó.
getListPosts(): Observable<HttpResponse<PostEntityModel[]>> {
  return this.httpClient.get<PostEntityModel[]>(
    'https://jsonplaceholder.typicode.com/posts',
    { observe: 'response' });
}
Kết quả:
Chúng ta đã có thêm thông tin để xử lý tiếp rồi:)
1.2.3 Observe ‘events’
Khi sử dụng observe: 'events', chúng ta sẽ nhận được full event của 1 Http Request. Thực tế là nó sẽ đi từ bắt đầu gọi request tới lúc request response hoàn chỉnh
Hãy để ý nhé:
createPost(post: Partial<PostEntityModel>): Observable<HttpEvent<PostEntityModel>> {
  return this.httpClient.post<PostEntityModel>(
    'https://jsonplaceholder.typicode.com/posts',
    post,
    { observe: 'events' }
  );
}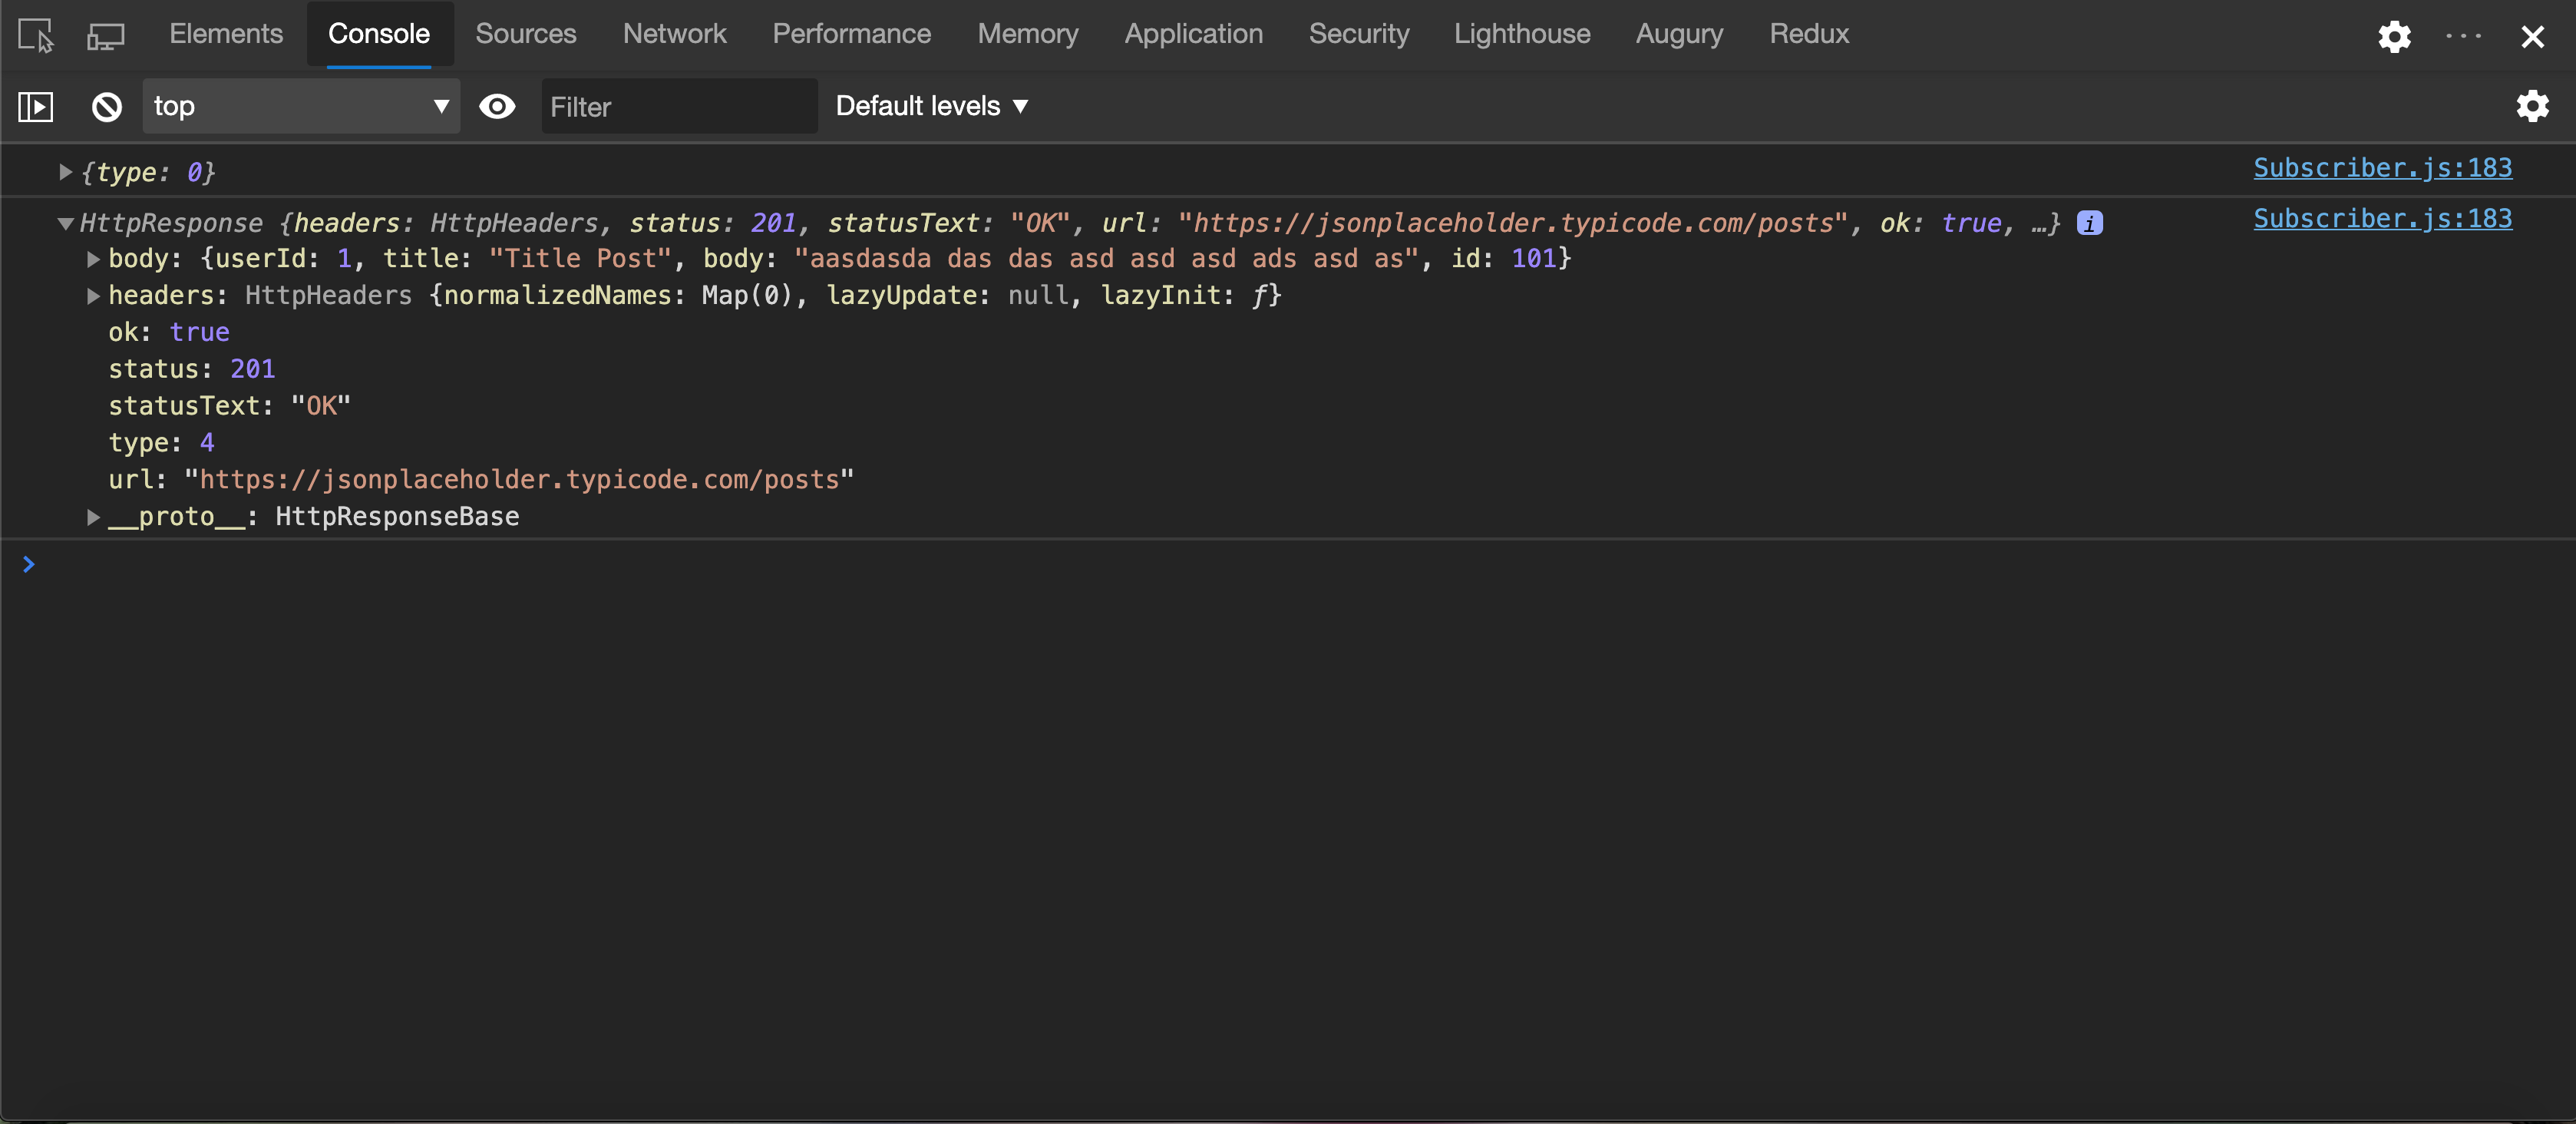
Các bạn thấy đấy, từ {type: 0} cho đến {type: 4} là lúc request hoàn thành rồi. Lát nữa chúng ta sẽ demo có sự góp mặt của Observe này
1.3 Params
Khi bạn có 1 task gọi 1 API endpoint có query params. Bạn có bao giờ tự hỏi rẳng Angular có cung cấp sẵn để thực hiện công việc này hay không?
Câu trả lời là CÓ, params trong Http Options giúp chúng ta thêm query params vào enpoint. Trong ví dụ sau đây, tôi cần thêm query params vào hàm GET:
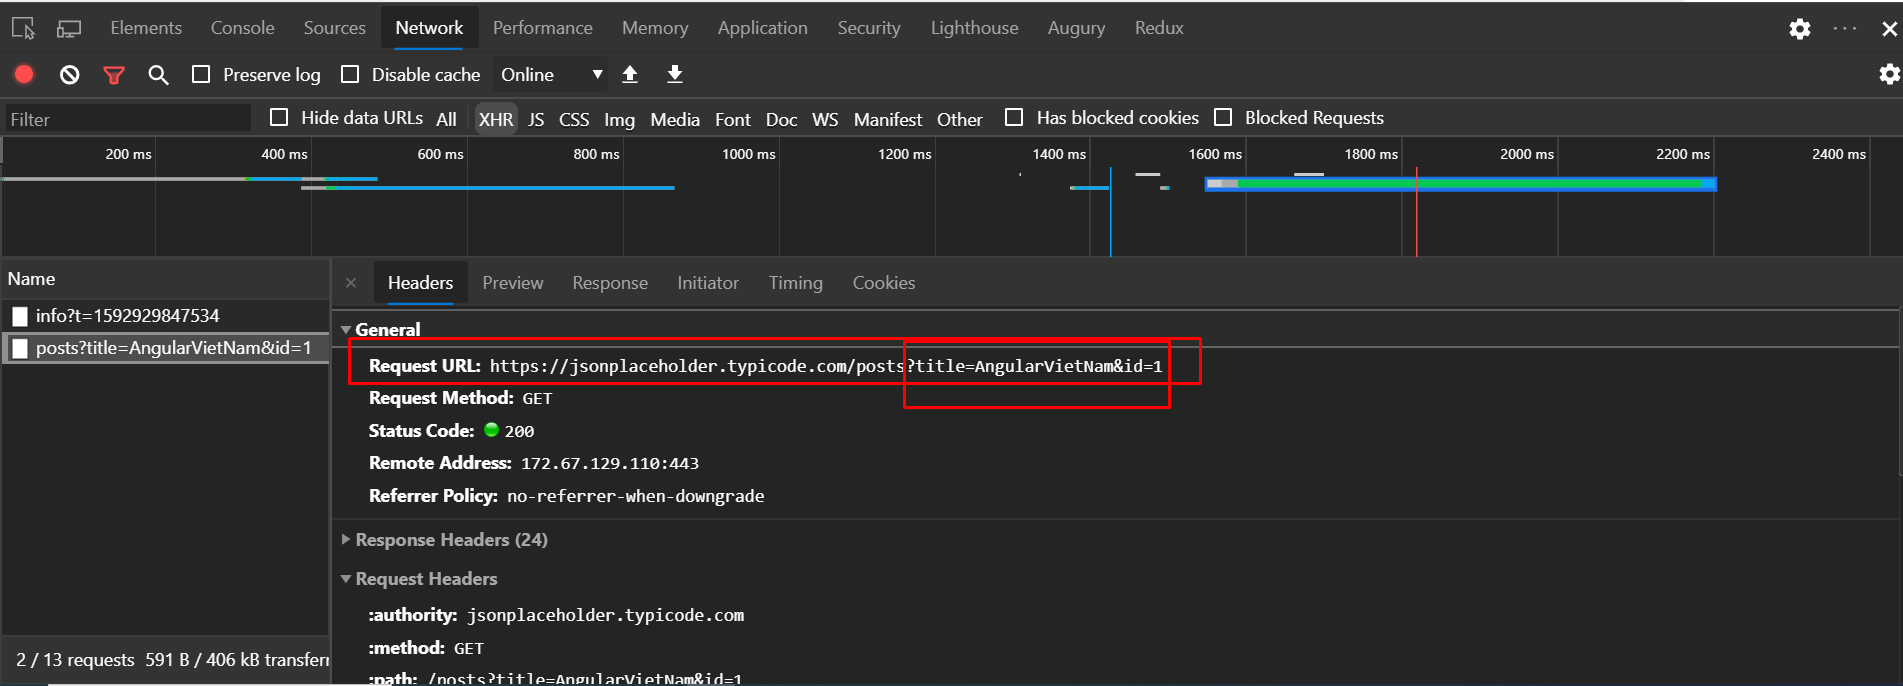
Có 3 cách để implement params options:
1.3.1 Sử dụng fromString option
getListPosts(): Observable<PostEntityModel[]> {
  return this.httpClient.get<PostEntityModel[]>(
    'https://jsonplaceholder.typicode.com/posts',
    {params: new HttpParams({ fromString: 'title=AngularVietNam&id=1' })}
  );
}
1.3.2 Sử dụng fromObject option
getListPosts(): Observable<PostEntityModel[]> {
  return this.httpClient.get<PostEntityModel[]>(
    'https://jsonplaceholder.typicode.com/posts',
    {params: new HttpParams({ fromObject: {title: 'AngularVietNam', id: '1'}})}
  );
}
Lưu ý: cách này value của các key luôn luôn là string nhé.
1.3.3 Sử dụng set method option
getListPosts(): Observable<PostEntityModel[]> {
  return this.httpClient.get<PostEntityModel[]>('https://jsonplaceholder.typicode.com/posts',
    {params: new HttpParams().set('title', 'AngularVietNam').set('id', '1')}
  );
}
Vì hàm set trả về chính instance của HttpParams đó nên chúng ta có thể chain.
Cả 3 đều có chung kết quả:
Http Params có một số method khác các bạn tự tìm hiểu nhé. Vì phần này cũng dễ nên mình không đi sâu thêm
class HttpParams {
  constructor(options: HttpParamsOptions = {} as HttpParamsOptions);
  has(param: string): boolean;
  get(param: string): string | null;
  getAll(param: string): string[] | null;
  keys(): string[];
  append(param: string, value: string): HttpParams;
  set(param: string, value: string): HttpParams;
  delete(param: string, value?: string): HttpParams;
  toString(): string;
}
1.4 reportProgress
reportProgress có giá trị boolean được dùng để thông báo progress event của chúng ta. Ví dụ chúng ta upload 1 hình ảnh thì nó sẽ report progress mình đã upload lên server. Các bạn có thể dùng dữ liệu này để show cho người dùng biết là đã upload được bao nhiêu %, ước tính thời gian xong .v.v
1.5 responseType
responseType option chỉ định HttpRequest đó sẽ trả về định dạng dữ liệu gì. Mặc định là 'json'. Có các option khác là 'arraybuffer' | 'blob' | 'json' | 'text'
1.6 withCredentials
Các HttpRequest trong Angular theo mặc định không truyền thông tin cookie với mỗi request. Điều này có nghĩa là nếu bạn muốn kèm theo thông tin Cookies, bạn phải sử dụng withCredentials
Sử dụng như sau:
getListPosts(): Observable<PostEntityModel[]> {
  return this.httpClient.get<PostEntityModel[]>('https://jsonplaceholder.typicode.com/posts',
    {withCredentials: true}
  );
}
Và kết quả là đã có thông tin Cookies rồi nhé:
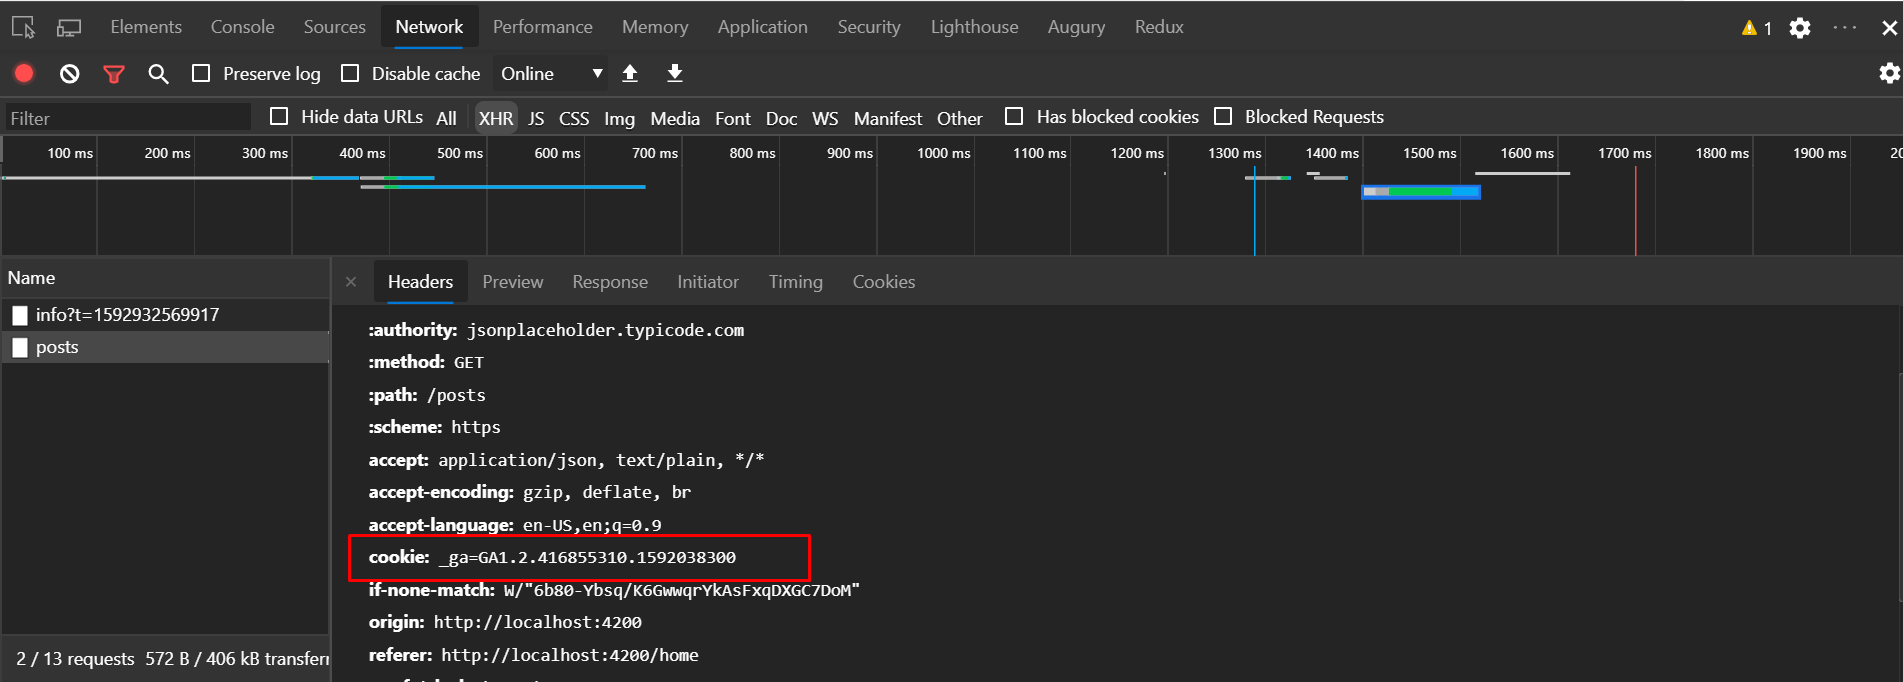
Note: Hãy đảm bảo Allow-Origin-With-Credentials được set trong CORS trên server nhé. Nếu không sẽ bị chặn bởi CORS
Ok vậy là chúng ta đi xong Http Request Options. Tiếp theo chúng ta sẽ làm một demo nhỏ nhỏ upload, download file kèm progress nhé. Let’s go !
2. Demo cùng Author
2.1 Upload with Progress
Chúng ta cùng đi qua một ứng dụng upload đơn giản nhé.
<!--  Upload component html -->
<div *ngIf="arrayFileUpload.length > 0 && progress.percentage !== -1" class="progress">
  <div class="progress-bar" role="progressbar" aria-valuemin="0" aria-valuemax="100"
    [ngStyle]="{width:progress.percentage+'%'}">
  </div>
</div>
<label for="fileUpload" class="default-upload" *ngIf="arrayFileUpload.length < 1; else localImage">
  <img class="img-responsive default-image" src="//laichau.qlgd.vn/static/article/images/noimg.gif" alt="No image" />
</label>
<ng-template #localImage>
  <div class="image-col" *ngFor="let img of arrayFileUpload; let i = index">
    <label for="fileUpload">
      <img *ngIf="img.url !== null" [src]="img.url" alt="Preview image" class="img-responsive" />
    </label>
  </div>
</ng-template>
<label class="btn btn-default" hidden>
  <input type="file" (change)="selectFile($event)" id="fileUpload">
</label>
Style xíu cho thanh progress bar
.progress-bar {
  height: 5px;
  background: #129ad4;
}

.img-responsive,
.default-image {
  max-width: 500px;
}
Tạo service để upload:
import { Injectable } from '@angular/core';
import { HttpClient, HttpEvent } from '@angular/common/http';
import { Observable } from 'rxjs';

const BASE_URL = 'YOUR_URL_API';

@Injectable({
  providedIn: 'root'
})
export class UploadService {
  constructor(private http: HttpClient) {}

  postFile(files: FileList): Observable<HttpEvent<Object>> {
    const formData: FormData = new FormData();
    for (let i = 0; i < files.length; i++) {
      formData.append('files', files[i], files[i].name);
    }
    return this.http.post(`${BASE_URL}`, formData, {
      observe: 'events',
      reportProgress: true
    });
  }
}
Vì upload hình ảnh yêu cầu phải multipart/formdata nên phải khởi tạo instance của FormData nhé. Sau đó chúng ta append file và key vào. Ở đây server yêu cầu gửi file có key là fileUpload
// Upload component
import {
  ChangeDetectionStrategy,
  ChangeDetectorRef,
  Component,
  OnInit,
} from '@angular/core';
import {
  HttpErrorResponse,
  HttpEvent,
  HttpEventType,
  HttpProgressEvent,
  HttpResponse,
} from '@angular/common/http';
import { UploadService } from './upload.service';

type FileUpload = {
  url: string | null;
  fileName: string;
  fileType: string,
}

@Component({
  selector: 'app-upload',
  templateUrl: './upload.component.html',
  styleUrls: ['./upload.component.css'],
  changeDetection: ChangeDetectionStrategy.OnPush,
})
export class UploadComponent implements OnInit {
  progress: { percentage: number } = { percentage: -1 };
  arrayFileUpload: Array<FileUpload> = [];

  constructor(
    private uploadService: UploadService,
    private readonly cdr: ChangeDetectorRef,
  ) { }

  ngOnInit(): void {
  }

  private getFileList(event: Event): FileList | null {
    const target: HTMLInputElement = event.currentTarget as HTMLInputElement;
    return target.files;
  }

  selectFile(event: Event): void {
    this.progress.percentage = 0;
    const selectedFiles: FileList = this.getFileList(event);
    if (selectedFiles && selectedFiles.length > 0) {
      this.uploadLocal(selectedFiles);
      this.uploadService.postFile(selectedFiles).subscribe({
        next: (data: HttpEvent<HttpProgressEvent>) => {
          if (data.type === HttpEventType.UploadProgress) {
            this.progress.percentage = Math.round(100 * data.loaded / (data.total ?? 1));
            this.cdr.markForCheck();
          } else if (data instanceof HttpResponse) {
            console.log("Upload done")
          }
        },
        error: (error: HttpErrorResponse) => {
          alert(false);
        }
      });
    }
  }

  private uploadLocal(selectedFiles: FileList): void {
    for (let i = 0; i < selectedFiles.length; i++) {
      const reader: FileReader = new FileReader();
      const file: File = selectedFiles[i];
      this.arrayFileUpload[i] = {
        fileName: file.name,
        fileType: file.type,
        url: null,
      };
      reader.readAsDataURL(selectedFiles[i]);
      reader.onload = (event: ProgressEvent<FileReader>) => {
        this.arrayFileUpload[i].url = event?.target?.result as string;
        this.cdr.markForCheck();
      };
    }
  }
}
Và chúng ta đã có kết quả. Yeah yeah:) Progress bar theo tiến trình upload nhé.
Vậy là đã xong phần upload. Tiếp theo mình chuyển qua download nhé:)
2.2 Download with Progress
<div
  class="progress"
  *ngIf="progress >= 0"
  [ngStyle]="{width: progress + '%'}"
></div>
<button (click)="downloadFile()">Download File</button>
.progress {
height: 3px;
background: #129AD4;
}progress: number = -1;
downloadFile(): void {
this.downloadService.downloadFile('https://cdn.filestackcontent.com/sZ9r8Bp5SCSZcY2TxPYn').subscribe({
next: (data: HttpEvent<HttpProgressEvent>) => {
switch (data.type) {
case HttpEventType.DownloadProgress:
this.progress = Math.round(100 * data.loaded / data.total);
break;
case HttpEventType.Response:
this.saveFile(data.body, 'test.png');
}
}
});
}
private saveFile(data: Blob, fileName: string): void {
const link = document.createElement('a');
link.href = window.URL.createObjectURL(data);
link.download = fileName;
link.click();
}Kết quả:

Vậy là đã xong 2 demo rồi. Các bạn code theo mình đã chạy được chưa:)? Code chưa
được thì code lại nhé :) không hiểu thì comment hỏi nha. Chung quy lại. Angular HttpClient cung cấp cho chúng ta những options bá đạo, giúp ích cho chúng ta rất
nhiều trong công việc. Còn chờ gì nữa, hãy áp dụng những kiến thức này vào những
case thực tế ngay khi có thể nhé. Bài viết hôm nay đến đây là kết thúc. Bài sau mình
sẽ đi về Interceptor. Interceptor là một bài rất quan trọng, các bạn chú ý theo
dõi nhé. Cảm ơn mọi người
Link tham khảo: